Objects Tab
Deep Dive
The Objects tab is your central hub for managing all geotechnical objects within a project. Learn how to add, import, export, and organize boreholes, CPTs, and SPTs efficiently.
Interface Overview
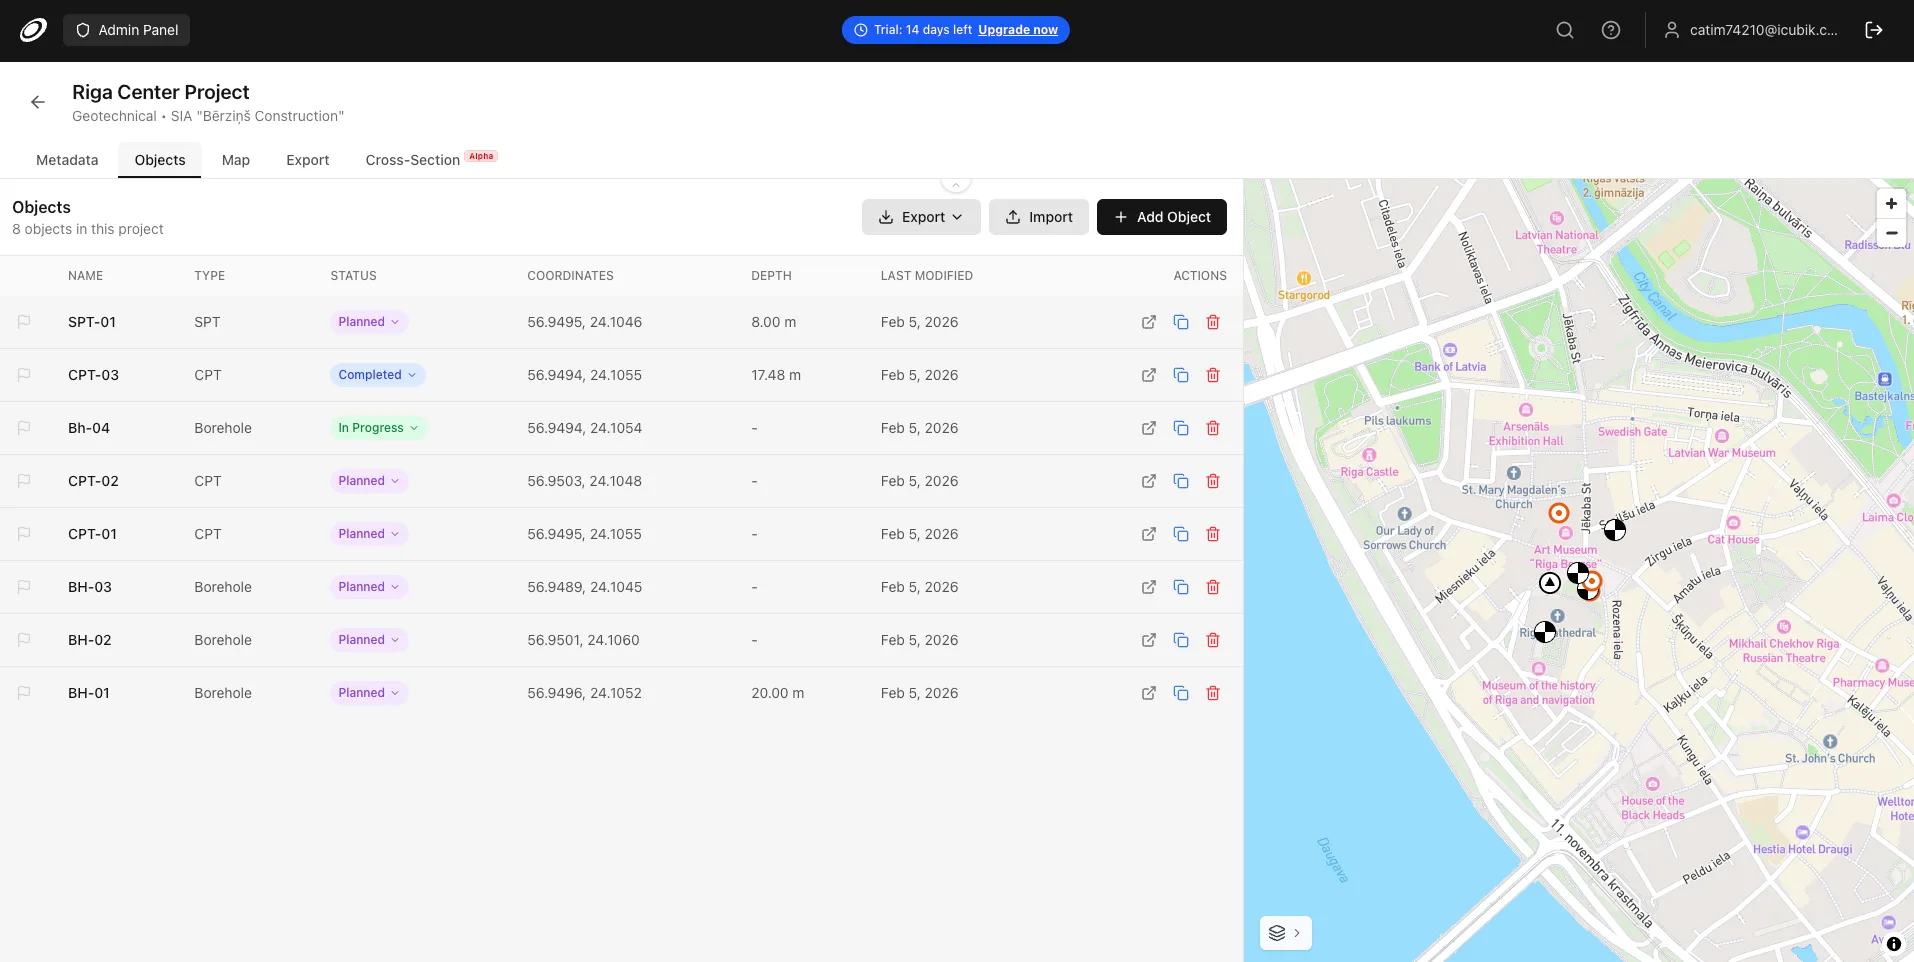
The Objects tab is divided into two main areas: the object table (65% width) on the left, and an interactive minimap (35% width) on the right. This layout allows you to manage data while seeing object locations in real-time.
Toolbar Buttons
The toolbar at the top of the Objects tab provides quick access to common actions:
Export Button
Click the Export button to download a list of all objects in the project. Two formats are available:
- Simple comma-separated format, compatible with any spreadsheet application. Great for sharing with contractors or importing into other systems.
- Professionally styled spreadsheet with headers, report title, project name, object count, and alternating row colors. Ideal for official documentation.
Practical Example
Export the object list to Excel and send it to your field team as a checklist of all investigation points with their coordinates, status, and depth.
Import Button
Click Import to bulk-import multiple objects from external files. Supported formats include CSV, XLSX, and KML. See the detailed Import Modal section below.

Add Object Button
Click + Add Object to create a single new object manually. You'll select the object type (Borehole, CPT, or SPT) and enter basic information like name, coordinates, and elevation.


Object Table
The object table displays all investigation points in your project with the following columns:
Table Columns
- Click the flag icon to mark objects that need attention. Flagged objects display a red filled flag. Use this to highlight problematic data, incomplete logs, or objects requiring review.
- The object identifier (e.g., BH-01, CPT-15). Names should be unique within a project.
- Object type - Borehole, CPT, or SPT. Determines which data tabs and fields are available.
- Click the status badge to change workflow status: Planned (purple), In Progress (green), or Completed (blue).
- Latitude and longitude in WGS84 format. Objects with coordinates appear on the minimap.
- Total depth calculated automatically from the actual data - stratigraphy layers for boreholes, measurement points for CPT/SPT.
- Shows when the object was last updated. Useful for tracking recent work.

Row Actions
Each row in the table has action buttons on the right side:
- Opens the object detail page where you can edit all data including stratigraphy, samples, water levels, and test data.
- Creates a complete copy of the object including all associated data - stratigraphy layers, soil properties, samples, water levels, CPT/SPT measurements, and calculated stratigraphy. The new object is named "[Original Name] (Copy)".
- Permanently removes the object and all associated data. A confirmation dialog appears before deletion.
Practical Example
Use Duplicate when you have a standard borehole template with typical stratigraphy. Copy it as a starting point, then adjust the depths and soil types for the new location.Clicking a Row
Clicking anywhere on a row (except action buttons) selects the object. The selected row is highlighted with a blue background, and the minimap zooms to show that object with a popup displaying its name.

Status Workflow
Objects have a simple three-stage workflow status that helps track fieldwork and data entry progress:
- Initial state for objects that haven't been investigated yet. Use for planning investigation locations before fieldwork begins.
- Field investigation is underway or data entry is ongoing. The object has some data but isn't complete.
- Investigation is finished and all data has been entered and verified.
To change status, click the colored status badge. A dropdown appears with all status options. Select the new status and it updates immediately.

Minimap
The minimap on the right side of the Objects tab provides a geographic overview of all objects with coordinates.
Minimap Features
- Each object displays with a type-specific icon (borehole, CPT, or SPT symbol). Click a marker to select that object in the table.
- The selected object's marker is highlighted with a blue glow and scaled larger. A popup shows the object name.
- When the map loads, it automatically zooms to fit all objects with padding.
- Use the zoom controls (+/-) in the top-right corner, or scroll to zoom. Click and drag to pan.

Changing Map Style
Click the Layers button in the bottom-left corner of the minimap to open the style picker. Choose from multiple Mapbox basemap styles including satellite imagery, streets, light, and dark themes.

Import Objects Modal
The Import modal allows you to bulk-import objects from external files. This is the fastest way to create many objects at once, especially when you have coordinate data from GPS surveys or CAD exports.
Supported Formats
- Comma or semicolon-separated text files. The system auto-detects the delimiter. Must contain columns for name and coordinates.
- Excel spreadsheet files. Data is read from the first sheet.
- Google Earth/Maps format. Imports Placemark elements with name and coordinates. Perfect for data exported from Google Earth, GPS devices, or GIS software.
Import Workflow (CSV/XLSX)
For tabular data (CSV/XLSX), the import process has these steps:
Drag and drop your file or click to browse. The system detects the file type and reads the data.

Choose the file to import and confirm the format detected by Borebase.
- Select WGS84 (standard lat/lon) or LKS-92 (Latvian national grid). LKS-92 coordinates are automatically converted to WGS84.
- If your file has header rows, specify which row contains the first data record.
- Select Borehole or CPT as the default type for imported objects.
- Auto-detected but can be changed to semicolon, comma, or tab.

Assign columns from your file to Borebase fields (Name*, Latitude*, Longitude*, Elevation, Type). Required fields are marked with asterisk. The system auto-detects common column names in English, Russian, and Latvian.

Check the data preview to ensure columns are mapped correctly. Mapped columns are highlighted.

For each object, verify or change the object type (Borehole or CPT).

Click Import to create the objects. The system shows progress and reports any errors.
Import Workflow (KML)
For KML files, the process is simpler since coordinates are already in the correct format:
- Upload the KML file. All Placemark elements are automatically parsed.
- Select the default object type (Borehole or CPT).
- Review the list of objects with their names and coordinates. Change individual object types if needed.
- Click Import to create all objects.
Column Auto-Detection
When importing CSV or XLSX files, Borebase automatically detects columns based on header names. The following names are recognized:
Field
When importing CSV or XLSX files, Borebase automatically detects columns based on header names. The following names are recognized:
Coordinate Systems
Borebase supports two coordinate systems for importing data:
Example:
The default global coordinate system using latitude and longitude in decimal degrees. This is the standard format used by GPS devices, Google Maps, and most mapping applications.
The Latvian national coordinate system using X/Y coordinates in meters. When you select LKS-92, the import modal shows X(m) and Y(m) labels instead of Longitude and Latitude. Coordinates are automatically converted to WGS84 during import.
Practical Example
If you receive coordinate data from a Latvian land survey or CAD drawings in the national grid, select LKS-92 before mapping columns. Borebase handles the conversion automatically.Exported Data Format
When you export objects to CSV or Excel, the following columns are included:
- Click the flag icon to mark objects that need attention. Flagged objects display a red filled flag. Use this to highlight problematic data, incomplete logs, or objects requiring review.
- The object identifier (e.g., BH-01, CPT-15). Names should be unique within a project.
- Object type - Borehole, CPT, or SPT. Determines which data tabs and fields are available.
- Click the status badge to change workflow status: Planned (purple), In Progress (green), or Completed (blue).
- Latitude and longitude in WGS84 format. Objects with coordinates appear on the minimap.
- Total depth calculated automatically from the actual data - stratigraphy layers for boreholes, measurement points for CPT/SPT.
Practical Example
Export your completed objects to Excel and use the coordinates to create a location map in CAD software, or import them into GIS for spatial analysis.Related Features
The Objects tab connects to other parts of Borebase:
- Learn about stratigraphy, samples, water levels, and construction for boreholes.
- Understand CPT data import, calculations, and graph analysis.
- Learn about SPT data entry, corrections, and correlations.
- Full-screen map with layers, measurements, and PDF export.
- Create professional PDF reports from your object data.
Ready to manage your geotechnical objects?