Stratigraphy Tab
Deep Dive
The Stratigraphy tab is where you log soil and rock layers for your boreholes. Create layers manually or import from CSV/Excel, assign ISO 14688 soil classifications, customize hatch patterns, and view related CPT/SPT data alongside.
Interface Overview
The Stratigraphy tab is divided into two main areas:
- Visual representation of soil/rock layers with hatch patterns, depth scale, and layer names. Click any layer to edit.
- When CPTs or SPTs are linked to the borehole, their stratigraphy or graphs appear here for side-by-side comparison.
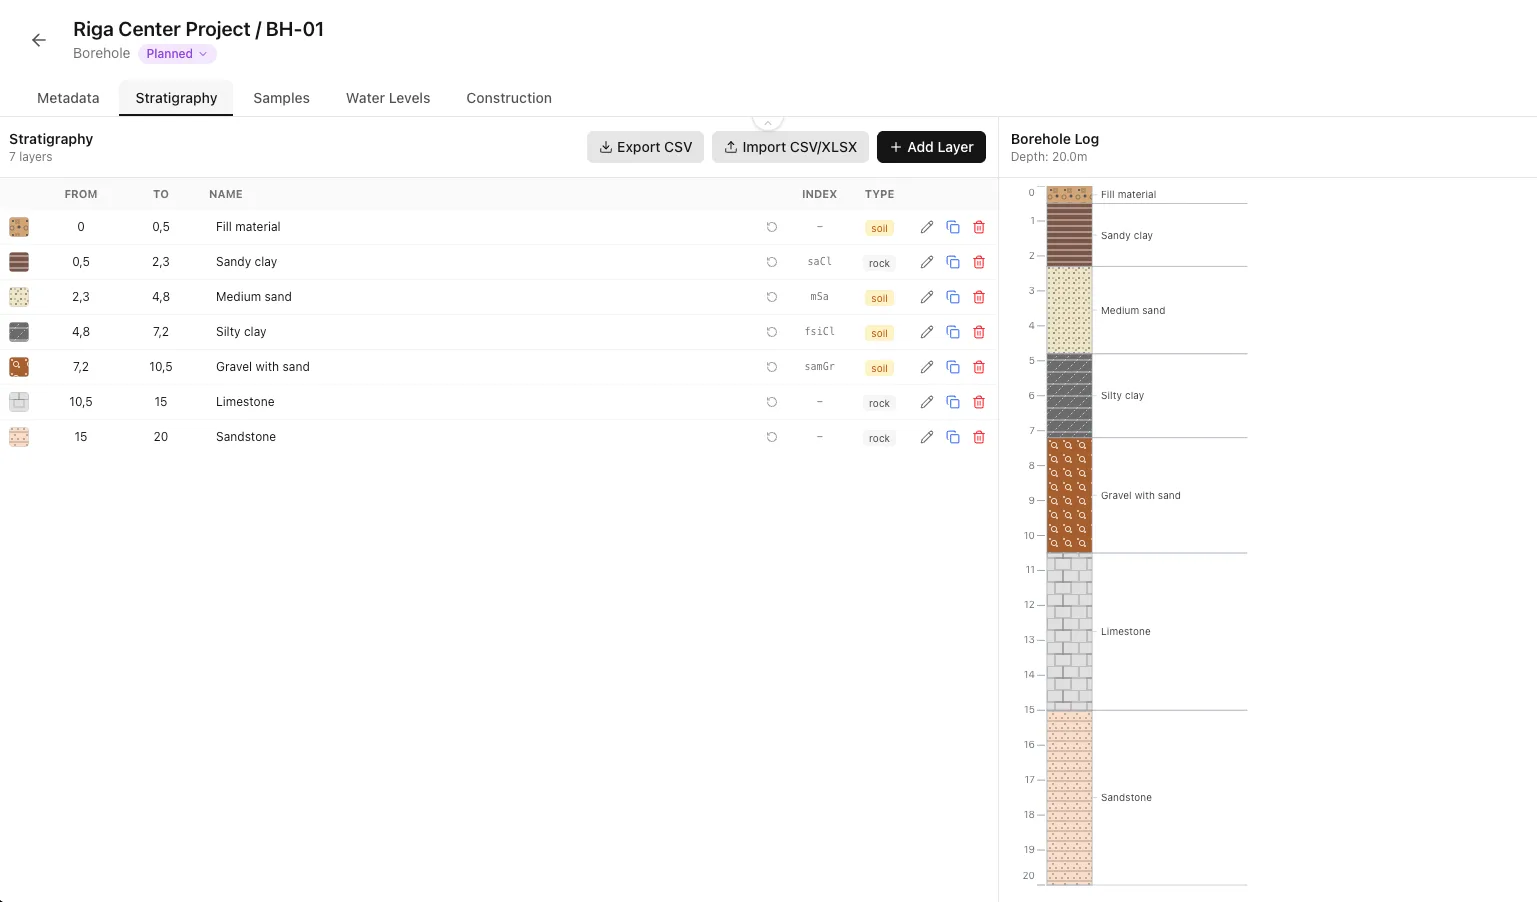

Toolbar Buttons
- Opens the layer creation modal. If layers exist, depth_from is auto-populated with the last layer's depth_to.
- Bulk import layers from CSV or Excel files.
- Download all stratigraphy data as a CSV file.
Creating a New Layer
Click "+ Add Layer" to open the layer creation modal. The workflow differs slightly for soil vs rock layers.
Soil Layers
- Select "Soil" as the layer type (default)
- Enter Depth From and Depth To (meters)
- Select Main Material (required) - e.g., Clay, Sand, Gravel
- Optionally select Secondary Material (modifier) - e.g., silty, sandy
- Optionally select Tertiary Material (additional modifier)
- Layer name and ISO index code are auto-generated from materials
- Override the auto-generated name in the "Custom Name" field if needed
- Click Save to create the layer


ISO 14688 Classification
Materials follow ISO 14688-1 standard. The system automatically generates the ISO index code (e.g., "saGr" for sandy Gravel) and a default name from your material selections.Rock Layers
- Select "Rock" as the layer type
- Enter Depth From and Depth To (meters)
- Select Rock Type (Igneous, Sedimentary, Metamorphic)
- Select Rock Category within that type
- Select specific Rock Name (e.g., Granite, Limestone)
- Click Save to create the layer

Advanced Soil Properties
Click "Show Advanced" in the layer modal to access additional soil classification fields:

Physical Properties
- Non-plastic, Low, Medium, High - for fine-grained soils
- Dry, Slightly Moist, Moist, Very Moist, Wet
- Very Soft to Very Stiff - for cohesive soils
- Homogeneous, Layered, Fissured, etc.
Grain Size Distribution
- Percentage of particles < 0.002mm
- Percentage of particles 0.002-0.063mm
- Percentage of particles 0.063-2mm
- Percentage of particles 2-63mm
- Percentage of particles > 63mm
Atterberg Limits
- Water content at which soil transitions from plastic to liquid state
- Water content at which soil transitions from semi-solid to plastic state
- Toggle if layer contains organic material
Hatch Patterns & Colors
Each layer displays a geological hatch pattern representing the soil or rock type. The system provides default patterns based on ISO 14688, BS5930, and USCS standards.
Default Hatch Assignment
Hatches are automatically assigned based on the main material selection:
- Horizontal lines
- Diagonal dashed lines
- Dots (size varies with grain size)
- Circles/ovals
- Large irregular shapes
- Grass-like marks
- Brick-like or block patterns
Customizing Hatch Patterns
To change a layer's hatch pattern:
- Click the hatch swatch in the layer row
- The Hatch Picker opens showing all available patterns
- Browse patterns organized by category (Fine Soils, Coarse Soils, Rock)
- Click a pattern to apply it immediately


Customizing Background Color
Each layer has a background color behind the hatch pattern:
- Default colors are assigned based on material type (browns for sand, grays for rock, etc.)
- Click the color swatch to open the color picker and select a custom color
- Toggle "White Pattern" to render hatch lines in white instead of black (useful for dark backgrounds)
Layer Table & Inline Editing
Layers are displayed in a table with inline editing capabilities:
Table Columns
- Visual preview of the hatch pattern. Click to change.
- Starting depth. Click to edit inline.
- Ending depth. Click to edit inline.
- Display name (auto-generated or custom). Click to edit inline.
- ISO index code (read-only, generated from materials).
- Edit (pencil), Duplicate (copy), Delete (trash) buttons.
Inline Editing
Quick edits can be made directly in the table:
- Click on a depth or name cell to start editing
- Type the new value
- Press Enter or click away to save
- Press Escape to cancel
Inline Editing
Quick edits can be made directly in the table:


Duplicating Layers
Click the copy icon to duplicate a layer. The new layer:
- Copies all material selections, hatch, and color
- Is placed at the end of the stratigraphy
- Has 1 meter thickness by default
- Adjust depths as needed after duplication
Practical Example
When logging a borehole with alternating sand and clay layers, create one of each, then duplicate and adjust depths. Much faster than creating each layer from scratch.Importing Stratigraphy Data
Bulk import layers from spreadsheets when you have existing logging data.
Supported Formats
- Comma, semicolon, or tab-separated values
- Microsoft Excel files (reads first sheet)
Required Columns
- Starting depth in meters (aliases: from, top, start_depth)
- Ending depth in meters (aliases: to, bottom, end_depth)
- Layer description (aliases: layer, description, material)
Optional Columns
"soil" or "rock" - defaults to soil if not specified
Import Workflow
- Click Import button in the toolbar
- Drag & drop your file or click to browse
- System auto-detects delimiter and column mappings
- Review the column mapping and adjust if needed
- Set the data start row (skip header rows)
- Choose default type (soil/rock) for rows without type column
- Review validation warnings (overlapping depths, invalid ranges)
- Click Import to process the data


Validation Warnings
The system checks for invalid depth ranges (to <= from), overlapping depths, and missing names. Warnings are non-blocking - you can proceed with import, but should review flagged rows.Related CPT/SPT Data
When CPT or SPT tests are linked to a borehole (via the Related Borehole field in CPT/SPT metadata), their data appears in the right panel.
View Modes
- Shows CPT-interpreted stratigraphy (SBT classification) alongside borehole stratigraphy for comparison.
- Shows CPT parameter graphs (qc, fs, Rf, etc.) or SPT N-value graphs synchronized with borehole depth scale.
CPT Parameter Selection
In graph view, choose which CPT parameter to display:
- Cone resistance (MPa)
- Sleeve friction (kPa)
- Friction ratio (%)
- Pore pressure (kPa)
- Soil behavior type index
SPT Parameter Selection
For linked SPT tests, choose which parameter to display:
- Corrected SPT blow count
- Raw blow count
- Estimated friction angle


Practical Example
Link a CPT to a nearby borehole, then compare the CPT-derived soil classification with your logged stratigraphy. This helps validate your interpretations and identify discrepancies.Exporting Stratigraphy
Export your stratigraphy data for use in other applications:
CSV Export
Click "Export CSV" in the toolbar to download all stratigraphy data. The CSV includes:
- Depth from/to
- Layer name
- ISO index code
- Strata type
- Material IDs

Practical Example
Export stratigraphy to CSV, then import it into your company's geotechnical analysis software or GIS system. The standardized format ensures compatibility.PDF Export (via Export Tab)
For professional borehole log PDFs, use the Export tab. Stratigraphy data items available:
- Visual column with hatch patterns
- Text column with layer descriptions and index codes
Best Practices
Logging Tips
- Always use the material classification system rather than custom names alone - this ensures ISO compliance and enables proper hatch assignment.
- Log layers as you encounter them in the field, not afterwards - the auto-depth feature makes this efficient.
- Use the description field in addition to material classification for site-specific notes (color, inclusions, etc.).
Import Tips
- Prepare your spreadsheet with clear column headers matching the expected aliases (depth_from, depth_to, name).
- Review validation warnings - overlapping depths often indicate data entry errors that should be corrected.
- After import, edit layers to add proper material classifications - imported layers only have names, not ISO materials.
Related Guides
- Create professional PDF borehole logs from your stratigraphy data.
- Manage soil samples and link them to stratigraphy layers.
- Learn about CPT data and how to link CPTs to boreholes.
- Record groundwater observations for the borehole.